Thursday, October 13, 2005
Installing a new hard disk into a Nokia IP130
Note: This will void your warranty. Nokia recommends you RMA faulty IP130s for repair.
Why:
I look after a number of Nokia appliances of varying models, but the IP130s were shipped with dodgy hard drives for which Nokia have issued a product notice. Most of the IP130s I have are out of warranty and I don’t have support for, so I thought it would be fun to crack one of the faulty units open and see what could be done to repair it. When I searched the net I didn’t get too much help, most postings suggested that a hard disk replacement could not be done without RMAing the IP130 to Nokia. I found this dude's blog entry as a starting point and refined the steps from there.
How it works:
Nokia uses a 4Mb boot partition to store their boot manager. The IPSO filesystems are loaded from the second partition (which uses the remainder of the disk). To reload IPSO onto a blank disk you need to setup the disk with two partitions and copy the boot manager into partition 1.
Required tools:
- Linux R.I.P rescue CD download and burn Bootable CD ISO (RIP-14.7.grub.iso.bin) image
- Nokia boot flash, download from Nokia (requires logon to site), or use the CD that shipped with the IP130. This file is called something like: nkipflash-3.8.bin. The version doesn’t really matter as it will be upgraded if required you load IPSO
- Nokia IPSO operating system, download from Nokia (requires logon to site), or use the CD that shipped with the IP130.
- 2.5” to 3.5” hard disk conversion cable
- Replacement 2.5” hard disk (I’ve not tested >20Gb, but 20Gb and less work OK)
- PC with IDE bus and CDROM drive
- Torx (T6 I think) screwdriver, and a Philips head screwdriver
Prepare Replacement Disk:
- Cable up the 2.5” drive with the conversion cable into the PC and boot. I just use auto IDE drive detection. Make sure it’s the only hard disk in the PC
- Boot from the RIP CD and start the Linux Rescue System
- Logon as root
- Run fdisk /dev/hda and enter the following commands:
p (print partition list)
d (delete any existing partitions)
n (create new partition)
p (primary)
1 (partition #1)
1 (first cylinder)
+4096K (last cylinder)
n (create new partition)
p (primary)
2 (partition #2)
default (first cylinder)
default (last cylinder)
p (print partition list to see if you’re got two partitions)
t (change partition ID)
partition 1
hex code: a6
t (change partition ID)
partition 2
hex code: a5
a (set boot partition)
partition 1
w (write to disk)
- Insert your CD with the Nokia flash file
- mount /dev/hdd –t iso9660 /mnt/cdrom
- The CD should mount as read only.
- cd /mnt/cdrom
- Use the ls and cd commands to navigate to the flash file nkipflash-3.8.bin
- dd if= nkipflash-3.8.bin of=/dev/hda1
- halt
- Wait for power off to display and then power off the PC. Remove the 2.5” drive from the PC.
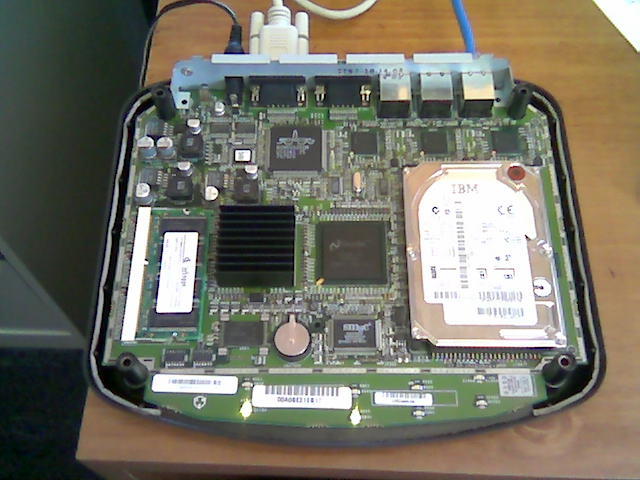
IP130 Disassembly:
- Remove the four main Torx screws from under the IP130
- Open the case and remove the three Torx screws that secure the mainboard
- Remove the mainboard, flip it over and remove the four screws that secure the hard disk
- Replace the old hard disk with the newly prepared disk.
- Connect the console cable and start your terminal emulator
- Power up the IP130
- If successful you should end up with a BOOTMGR[1]> prompt from where you can reload IPSO using the install command.
- Replace all the screws (don’t forget the ones under the hard drive) and load your applications.

Why:
I look after a number of Nokia appliances of varying models, but the IP130s were shipped with dodgy hard drives for which Nokia have issued a product notice. Most of the IP130s I have are out of warranty and I don’t have support for, so I thought it would be fun to crack one of the faulty units open and see what could be done to repair it. When I searched the net I didn’t get too much help, most postings suggested that a hard disk replacement could not be done without RMAing the IP130 to Nokia. I found this dude's blog entry as a starting point and refined the steps from there.
How it works:
Nokia uses a 4Mb boot partition to store their boot manager. The IPSO filesystems are loaded from the second partition (which uses the remainder of the disk). To reload IPSO onto a blank disk you need to setup the disk with two partitions and copy the boot manager into partition 1.
Required tools:
- Linux R.I.P rescue CD download and burn Bootable CD ISO (RIP-14.7.grub.iso.bin) image
- Nokia boot flash, download from Nokia (requires logon to site), or use the CD that shipped with the IP130. This file is called something like: nkipflash-3.8.bin. The version doesn’t really matter as it will be upgraded if required you load IPSO
- Nokia IPSO operating system, download from Nokia (requires logon to site), or use the CD that shipped with the IP130.
- 2.5” to 3.5” hard disk conversion cable
- Replacement 2.5” hard disk (I’ve not tested >20Gb, but 20Gb and less work OK)
- PC with IDE bus and CDROM drive
- Torx (T6 I think) screwdriver, and a Philips head screwdriver
Prepare Replacement Disk:
- Cable up the 2.5” drive with the conversion cable into the PC and boot. I just use auto IDE drive detection. Make sure it’s the only hard disk in the PC
- Boot from the RIP CD and start the Linux Rescue System
- Logon as root
- Run fdisk /dev/hda and enter the following commands:
p (print partition list)
d (delete any existing partitions)
n (create new partition)
p (primary)
1 (partition #1)
1 (first cylinder)
+4096K (last cylinder)
n (create new partition)
p (primary)
2 (partition #2)
default (first cylinder)
default (last cylinder)
p (print partition list to see if you’re got two partitions)
t (change partition ID)
partition 1
hex code: a6
t (change partition ID)
partition 2
hex code: a5
a (set boot partition)
partition 1
w (write to disk)
- Insert your CD with the Nokia flash file
- mount /dev/hdd –t iso9660 /mnt/cdrom
- The CD should mount as read only.
- cd /mnt/cdrom
- Use the ls and cd commands to navigate to the flash file nkipflash-3.8.bin
- dd if= nkipflash-3.8.bin of=/dev/hda1
- halt
- Wait for power off to display and then power off the PC. Remove the 2.5” drive from the PC.
IP130 Disassembly:
- Remove the four main Torx screws from under the IP130
- Open the case and remove the three Torx screws that secure the mainboard
- Remove the mainboard, flip it over and remove the four screws that secure the hard disk
- Replace the old hard disk with the newly prepared disk.
- Connect the console cable and start your terminal emulator
- Power up the IP130
- If successful you should end up with a BOOTMGR[1]> prompt from where you can reload IPSO using the install command.
- Replace all the screws (don’t forget the ones under the hard drive) and load your applications.

![]()